Analytics Resources: Insights, Best Practices,

Case Studies and More

close
Written by Adhil Mowlana
on October 23, 2017

7853.azureblog1.jpg


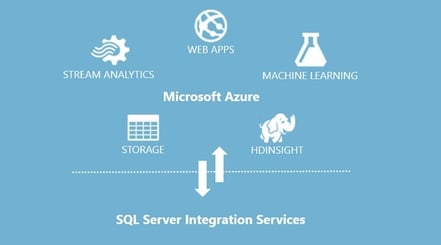
Azure Data Factory is a cloud-based data integration service while SQL Server Integration Service (SSIS) is the on-premise service for various operations including data transformations in ETL. However, it is still not matured as SSIS, and has a lot of limitations. We have used SSIS on-premise and SSIS in Azure is quite new. The purpose of this exercise is to experiment SSIS in Azure with ADF V2 hhosting the runtime in Azure.

Microsoft now provides an Azure-SSIS integration runtime (IR) in Azure Data Factory V2 to deploy and run SSIS packages on Azure. Please refer to https://docs.microsoft.com/en-us/azure/data-factory/concepts-integration-runtime#azure-ssis-integration-runtime for details on Azure-SSIS integration runtime. We can use SQL Server Data Tools (SSDT) or SQL Server Management Studio (SSMS) to deploy SSIS packages to this runtime on Azure, once Azure-SSIS integration runtime is deployed and configured. Deployment method is not graphical currently. Below is a summary on how to configure and deploy Azure-SSIS integration runtime and deploy SSIS packages.

We should have an Azure subscription for this exercise. Further, we need an SSIS package developed using SSDT for testing. Deployment of Azure-SSIS integration runtime (IR) in Azure would be done using PowerShell scripts.

  • Launch Windows PowerShell ISE (X86) as administrator, and import AzureRM module as below.

        Import-Module AzureRM

 If AzureRM is installed in the computer, you would see as below.
Next, run below command from the command prompt.
 
powershell Set-ExecutionPolicy Unrestricted -Scope CurrentUser


If Azure RM is not installed, you would need to install AzureRM with Administrator privileges as per below instructions.

By default, the PowerShell gallery is not configured as a Trusted repository for PowerShellGet. The first time you use the PSGallery you will see the below prompt.

 -----------------------------------------------------------------------

Untrusted repository


You are installing the modules from an untrusted repository. If you trust this repository, change its InstallationPolicy value by running the Set-PSRepository cmdlet.

Are you sure you want to install the modules from 'PSGallery'?

[Y] Yes  [A] Yes to All  [N] No  [L] No to All  [S] Suspend  [?] Help (default is "N"): Y

--------------------------------------------------------------------------

Answering as Yes or Yes to All will install the module. If you have a NuGet version older than 2.8.5.201, you will be prompted to download and install a latest version of NuGet. Please refer to https://docs.microsoft.com/en-us/powershell/azure/install-azurerm-ps?view=azurermps-4.4.0 for any details.


  • Create a resource group using Azure Portal under EastUS or EastUS2 location. Create a data factory with a unique name using Data Factory V2.

  • Next, run the below PowerShell script from PowerShell ISE (X86). Modify the script according to your settings before execution.
$SubscriptionName = "<Azure subscription name>"
$ResourceGroupName = "<Azure resource group name in EastUS>"
# Data factory name. Must be globally unique
$DataFactoryName = "<Data factory name created in the above resource group>"
# In public preview, only EastUS amd EastUS2 are supported.
$DataFactoryLocation = "EastUS"
 
# Azure-SSIS integration runtime information. This is a Data Factory compute resource for running SSIS packages
$AzureSSISName = "<Specify a name for your Azure-SSIS (IR)>"
$AzureSSISDescription = "<Specify description for your Azure-SSIS IR>"
# In public preview, only EastUS and NorthEurope are supported.
$AzureSSISLocation = "EastUS"
 # In public preview, only Standard_A4_v2, Standard_A8_v2, Standard_D1_v2, Standard_D2_v2, Standard_D3_v2, Standard_D4_v2 are supported
$AzureSSISNodeSize = "Standard_A4_v2"
# In public preview, only 1-10 nodes are supported.
$AzureSSISNodeNumber = 2
# In public preview, only 1-8 parallel executions per node are supported.
$AzureSSISMaxParallelExecutionsPerNode = 2
# SSISDB info – The DB server to create a new SSIS Catalogs
$SSISDBServerEndpoint = "<Azure SQL server name>.database.windows.net"
$SSISDBServerAdminUserName = "<Azure SQL server - user name>"
$SSISDBServerAdminPassword = "<Azure SQL server - user password>"
# Remove the SSISDBPricingTier variable if you are using Azure SQL Managed Instance (private preview)
# This parameter applies only to Azure SQL Database. For the basic pricing tier, specify "Basic", not "B".
# For standard tiers, specify "S0", "S1", "S2", 'S3", etc.
$SSISDBPricingTier = "<pricing tier of your Azure SQL server. Examples: Basic, S0, S1, S2, S3, etc.>"
 
$SSISDBConnectionString = "Data Source=" + $SSISDBServerEndpoint + ";User ID="+ $SSISDBServerAdminUserName +";Password="+ $SSISDBServerAdminPassword
 
$sqlConnection = New-Object System.Data.SqlClient.SqlConnection $SSISDBConnectionString;
Try
{
    $sqlConnection.Open();
}
Catch [System.Data.SqlClient.SqlException]
{
    Write-Warning "Cannot connect to your Azure SQL DB logical server/Azure SQL MI server, exception: $_"  ;
    Write-Warning "Please make sure the server you specified has already been created. Do you want to proceed? [Y/N]"
    $yn = Read-Host
    if(!($yn -ieq "Y"))
    {
        Return;
    }
}
Login-AzureRmAccount
Select-AzureRmSubscription -SubscriptionName $SubscriptionName
 
Set-AzureRmDataFactoryV2 -ResourceGroupName $ResourceGroupName `
                        -Location $DataFactoryLocation `
                        -Name $DataFactoryName
 
$secpasswd = ConvertTo-SecureString $SSISDBServerAdminPassword -AsPlainText -Force
$serverCreds = New-Object System.Management.Automation.PSCredential($SSISDBServerAdminUserName, $secpasswd)
Set-AzureRmDataFactoryV2IntegrationRuntime  -ResourceGroupName $ResourceGroupName `
                                            -DataFactoryName $DataFactoryName `
                                            -Name $AzureSSISName `
                                            -Type Managed `
                                            -CatalogServerEndpoint $SSISDBServerEndpoint `
                                            -CatalogAdminCredential $serverCreds `
                                            -CatalogPricingTier $SSISDBPricingTier `
                                            -Description $AzureSSISDescription `
                                            -Location $AzureSSISLocation `
                                            -NodeSize $AzureSSISNodeSize `
                                            -NodeCount $AzureSSISNodeNumber `
                                            -MaxParallelExecutionsPerNode $AzureSSISMaxParallelExecutionsPerNode
 
write-host("##### Starting your Azure-SSIS integration runtime. This command takes 20 to 30 minutes to complete. #####")
Start-AzureRmDataFactoryV2IntegrationRuntime -ResourceGroupName $ResourceGroupName `
                                             -DataFactoryName $DataFactoryName `
                                             -Name $AzureSSISName `
                                             -Force
 
write-host("##### Completed #####")
write-host("If any cmdlet is unsuccessful, please consider using -Debug option for diagnostics.")

This would run for 20 minutes.


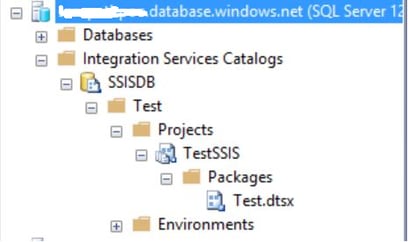
  • Once completed we can connect to the SSIS Catalogs created from the above step using SSMS version 17.2 or higher. In the Connect to the server dialog box in SSMS, enter the server name and credentials where SSIS Catalogs are created. Select Options and enter SSISDB in the Connect to database field in the expanded option dialog box to view the SSIS Catalogs.

 https://docs.microsoft.com/en-us/sql/integration-services/lift-shift/ssis-azure-connect-to-catalog-database

In the Object explorer, expand SSIS Catalogs, create a new folder. In the new folder, expand Project node and right click on it. Click on Deploy Project from the menu. This will start the integration services deployment wizard.


  • Create an SSIS project using SSDT. Create an SSIS package with a data flow task or SQL execute task. Build the project without errors. Please make sure an isac package is created in the build folders.

From the deployment wizard in the above step, locate isac file as the project file. Next, select Integration Services Catalog, and enter deployment server details in the destination page. You must enter the fully qualified name of the DB server. Browse the folder you created in the SSIS catalogs and deploy the SSIS packages. Once you have successfully deployed, you will see a similar interface as below. You can right click on the SSIS packages to execute.

 AzureRM-3.png


Once deployed we can schedule to run the packages from on-premise SQL Server Agent or from data factory SQL Server stored procedure activity. Currently, deployment steps are done through PowerShell, and hope Microsoft would introduce graphical interface to install and configure.
 
This approach of SSIS in Azure gives us the opportunity to utilize cloud based advantages for SSIS. SSISCatalog database created in Azure can be scaled up and down as required.


With this installation, it enables connectivity to Excel, Access and various Azure data sources. However, we cannot install third party components at the present. We can deploy SSIS packages in project deployment model and currently package deployment model is not supported. https://docs.microsoft.com/en-us/sql/integration-services/lift-shift/ssis-azure-lift-shift-ssis-packages-overview#benefits


Many developers are familiar with SSIS, and SSIS can be used to build complex data transformations easily. Many people have already built SSIS packages. With Azure-SSIS runtime we can easily deploy the existing packages to Azure rather than having to recreate or migrate.


You may also like:

SSIS in Azure SSIS Azure Data factory SQL Server 2017

Using ADF v2 and SSIS to load data from XML Source to SQL Azure

Since the release of Azure Data Factory V2, I have played around with it a bit, but have been looking for an opportunity...